Getting Started
Prerequisites
- Docker 24+ and Docker Compose v2
- Or for local development: Node.js 20+, npm, MongoDB 7+
Installation
Three deployment options are available — see Deployment Variants for a full comparison.
| Variant | Command | When |
|---|---|---|
| 1. Docker (single) | docker compose up -d |
Default — fastest start |
| 2. Docker replica set | docker compose -f docker-compose.replica.yml up -d |
HA MongoDB on Docker |
| 3. Kubernetes | ./k8s/scripts/deploy.sh |
K8s cluster |
Variant 1 — Docker (recommended for first run)
# Clone repository
git clone https://github.com/Dynamic-API-Platform/Dynamic-API-Platform.git
cd Dynamic-API-Platform

# Optional: copy and edit environment variables
cp .env.example .env

# Start all services
docker compose up -d

# Check status
docker compose ps
Wait until all three containers are healthy (dap-mongodb, dap-backend, dap-frontend).
Access the platform
- Open http://localhost:8080
- Log in with:
- Login:
admin - Password:
Admin123!
- Login:
- Go to Settings and change the admin password
- Open Settings → Software Updates to check for new releases or click Update now
- Update JWT secrets in
.envbefore any production use
Create your first dynamic endpoint
Via Admin UI
- Navigate to Endpoint Groups → create a group (e.g.
SHOP) - Go to Endpoints → New Endpoint
- Fill in:
- Name:
List Products - Path:
/api/products - Method:
GET
- Name:
- Open the full editor → Schema tab → add fields:
name— string, requiredprice— number, required
- Save and test on the Test tab
Via API (curl)
# 1. Get access token
TOKEN=$(curl -s -X POST http://localhost:3001/api/auth/login \
  -H "Content-Type: application/json" \
  -d '{"login":"admin","password":"Admin123!"}' \
  | jq -r '.data.accessToken')

# 2. Create endpoint
curl -X POST http://localhost:3001/api/endpoints \
  -H "Authorization: Bearer $TOKEN" \
  -H "Content-Type: application/json" \
  -d '{
    "name": "Products",
    "description": "Product catalog",
    "slug": "products",
    "path": "/api/products",
    "method": "GET",
    "accessType": "authenticated",
    "schema": [
      {"name": "name", "type": "string", "required": true, "order": 0},
      {"name": "price", "type": "number", "required": true, "order": 1}
    ]
  }'

# 3. Create a POST endpoint on the same path for writing data
curl -X POST http://localhost:3001/api/endpoints \
  -H "Authorization: Bearer $TOKEN" \
  -H "Content-Type: application/json" \
  -d '{
    "name": "Create Product",
    "path": "/api/products",
    "method": "POST",
    "accessType": "authenticated",
    "schema": [
      {"name": "name", "type": "string", "required": true, "order": 0},
      {"name": "price", "type": "number", "required": true, "order": 1}
    ]
  }'

# 4. Add data
curl -X POST http://localhost:3001/api/products \
  -H "Authorization: Bearer $TOKEN" \
  -H "Content-Type: application/json" \
  -d '{"name": "Laptop", "price": 999}'

# 5. Read data
curl http://localhost:3001/api/products \
  -H "Authorization: Bearer $TOKEN"
Link endpoints (reference fields)
Use type reference to connect records across endpoints (like a foreign key):
- Create the target endpoint first (e.g.
GET/POST /api/categorieswith anamefield) - POST a category and note its
idfrom the response - On Products, open Schema → add field
categoryId, typereference - Select Linked endpoint:
GET /api/categories — List Categories - Save. When creating a product, pass
"categoryId": "<category-record-id>"
Read with embedded category:
curl "http://localhost:3001/api/products?populate=categoryId" \
  -H "Authorization: Bearer $TOKEN"
Details: Dynamic API Engine — References.
Restrict API access by domain or IP
Network access is separate from JWT/RBAC. Use it to allow only specific frontends or server subnets.
Via Admin UI
- Endpoint Groups → edit group → Network Access section
- Enable rules, add domains (
app.example.com,*.example.com) and/or IP-CIDR (10.0.0.0/8)
- Enable rules, add domains (
- Endpoints → edit endpoint → Network Access tab
- Toggle Inherit rules from endpoint group or define endpoint-only rules
Example: partner webhook (IP only)
- Create
POST /api/webhooks/partnerwith access typepublicorauthenticated - Network Access tab → disable inherit → enable rules
- Add IP range:
203.0.113.0/24 - Save — calls from other IPs return
403 Forbidden: network access denied
Full guide: Network Access.
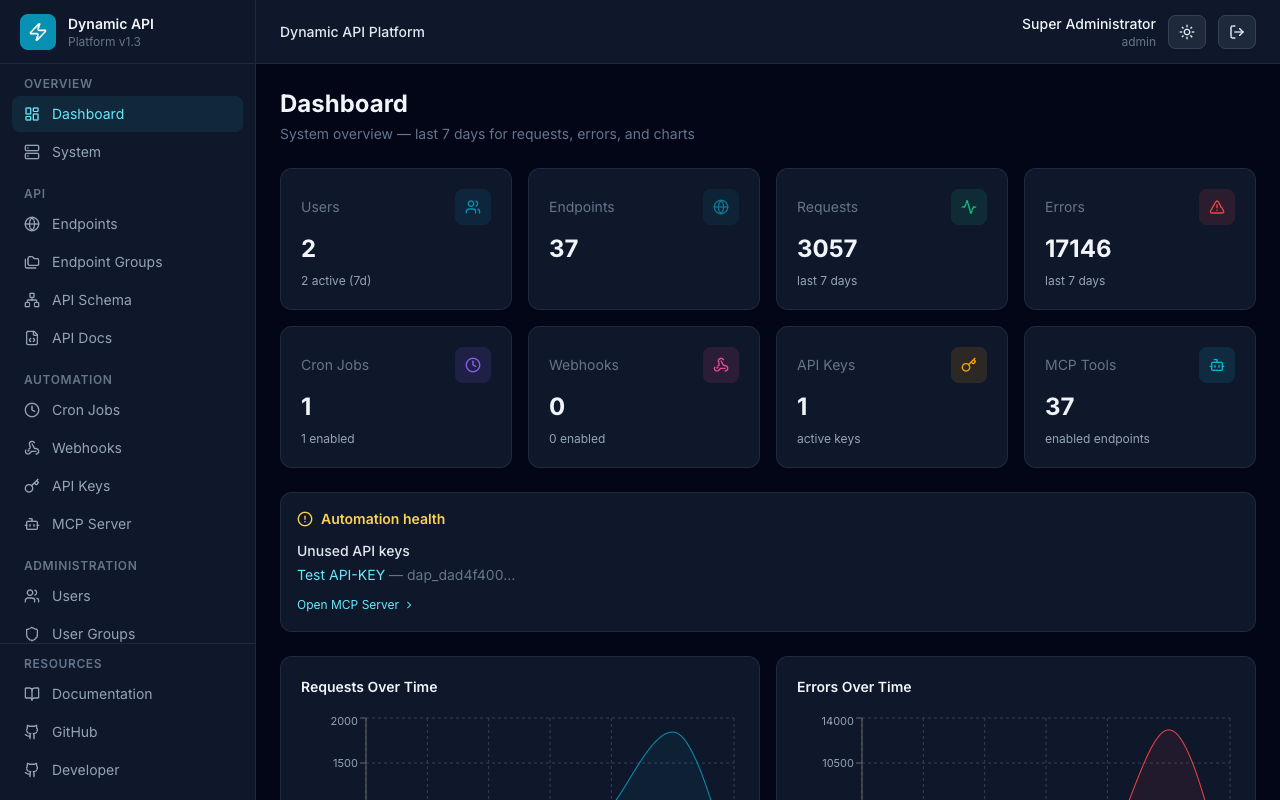
Navigation overview
| Section | Path | Description |
|---|---|---|
| Dashboard | / |
KPI cards, automation health, 7-day charts (requests, webhooks, cron, traffic by source) |
| Endpoints | /endpoints |
Manage APIs (grouped tables) |
| Endpoint Groups | /endpoint-groups |
Organize endpoints |
| API Schema | /api-schema |
Read-only ER diagram (groups, fields, FK arrows) |
| API Docs | /api-docs |
Embedded OpenAPI / Swagger UI |
| Cron Jobs | /cron |
Scheduled tasks |
| Webhooks | /webhooks |
Outbound event subscriptions |
| API Keys | /api-keys |
Machine-to-machine authentication |
| MCP Server | /mcp |
AI agent tools and JSON-RPC endpoint |
| Users | /users |
User management |
| User Groups | /groups |
RBAC permissions |
| Audit Logs | /logs |
API calls, webhooks, cron, MCP, auth events |
| Database | /database |
Raw MongoDB collections (JSON; requires manage_users) |
| System | /system |
Server resources |
| Settings | /settings |
Platform configuration |
Network access is configured under Endpoint Groups and the Network Access tab on each endpoint — not in Settings.
Interface preview
Next steps
- Read Architecture to understand the system design
- Review RBAC before adding team members
- Follow Deployment for production setup